Here you can find useful Nix code snippets.
Anki sync server on Nix-Darwin
I've tested the following configuration with Anki version 23.12.1.
Here's how to configure the Anki sync server to run on macOS using Nix-Darwin:
1. Configure and run Nix-Darwin
Make sure that Nix-Darwin works correctly on your machine. You can use a Nix flake file for configuring Nix-Darwin:
# flake.nix
{
  inputs = {
    nixpkgs.url = "github:NixOS/nixpkgs/nixos-24.05";
    nix-darwin.url = "github:LnL7/nix-darwin";
    nix-darwin.inputs.nixpkgs.follows = "nixpkgs";
  };
  outputs =
    { self
    , nix-darwin
    , nixpkgs
    }@inputs: {
      darwinConfigurations."lithium" =
        let
          system = "aarch64-darwin";
        in
        nix-darwin.lib.darwinSystem {
          inherit system;.Reverse
          modules = [
            { _module.args = inputs; }
            ./darwin-configuration.nix
          ];
        };
    };
}
Next, in the same folder as flake.nix, place a darwin-configuration.nix
file containing the following:
# darwin-configuration.nix
{ ... }:
{
  # ./anki.nix will be created further below
  imports = [ ./anki.nix ];
}
2. Adding the Anki sync server configuration Nix module
Now, add the below contents to a file called anki.nix in the same directory.
The file contains all the configuration needed to install and run
anki-sync-server as a launchd daemon.
Here's some more information about how to write Nix modules.
# anki.nix
{ pkgs, ... }:
let
  anki-sync-server = pkgs.anki-sync-server;
  logPath = "/var/log/anki-sync-server";
in
{
  # gid was chosen quite arbitrarily
  users.groups.anki-sync-server = { gid = 601; };
  users.users.anki-sync-server = {
    createHome = false;
    description = "Anki-sync-server user";
    gid = 601;
    # uid chosen arbitrarily
    uid = 601;
    isHidden = true;
  };
  users.knownGroups = [ "anki-sync-server" ];
  users.knownUsers = [ "anki-sync-server" ];
  launchd.daemons.anki-sync-server = {
    script = ''
      # This file will be created below
      SYNC_USER1="$(cat /etc/anki-sync-server/sync_user1)"
      export SYNC_USER1
      # If you are interested in hashing the password, read this:
      # https://docs.ankiweb.net/sync-server.html#hashed-passwords
      exec ${anki-sync-server}/bin/anki-sync-server
    '';
    serviceConfig = {
      KeepAlive = true;
      StandardOutPath = "${logPath}/anki-sync-server.stdout.log";
      StandardErrorPath = "${logPath}/anki-sync-server.stderr.log";
      UserName = "anki-sync-server";
      EnvironmentVariables = {
        SYNC_HOST = "127.0.0.1";
        SYNC_PORT = "18090";
        SYNC_BASE = "/var/anki-sync-server";
      };
    };
  };
3. Switch to the new Nix-Darwin configuration
Run the following in a bash session with Nix and Nix-Darwin available:
# change directory to the path where the above created flake.nix,
# darwin-configuration.nix, and anki.nix can be found
cd $TO_THAT_LOCATION
# then switch to the new configuration
darwin-rebuild switch --flake $PWD
darwin-rebuild may prompt you for your administrator password.
4. Create a user
Create a user that you can sign in with for Anki by placing a credentials file
containing username and password, separated by a colon, into
/etc/anki-sync-server/sync_user1.
Example:
local_anki_user:verysafepassw0rd
Make sure that only anki-sync-server user can read the credentials file.
chmod 400 /etc/anki-sync-server/sync_user1
chown anki-sync-server:anki-sync-server /etc/anki-sync-server/
5. Provision run time folder
The Anki sync server is almost good to go. It needs a directory to store
runtime data (your Anki decks etc.). Create the directories and make sure that
only anki-sync-server can read the runtime data with the following three
commands:
mkdir -p /var/anki-sync-server
chown anki-sync-server:anki-sync-server /var/anki-sync-server
chmod 0400 /etc/anki-sync-server/sync_user1
6. Kick start the server
Assuming that you haven't changed
launchd.labelPrefix
in nix-darwin, you can make sure that anki-sync-server starts correctly by
running
sudo launchctl kickstart -k -p system/org.nixos.anki-sync-server
7. Connect with Anki
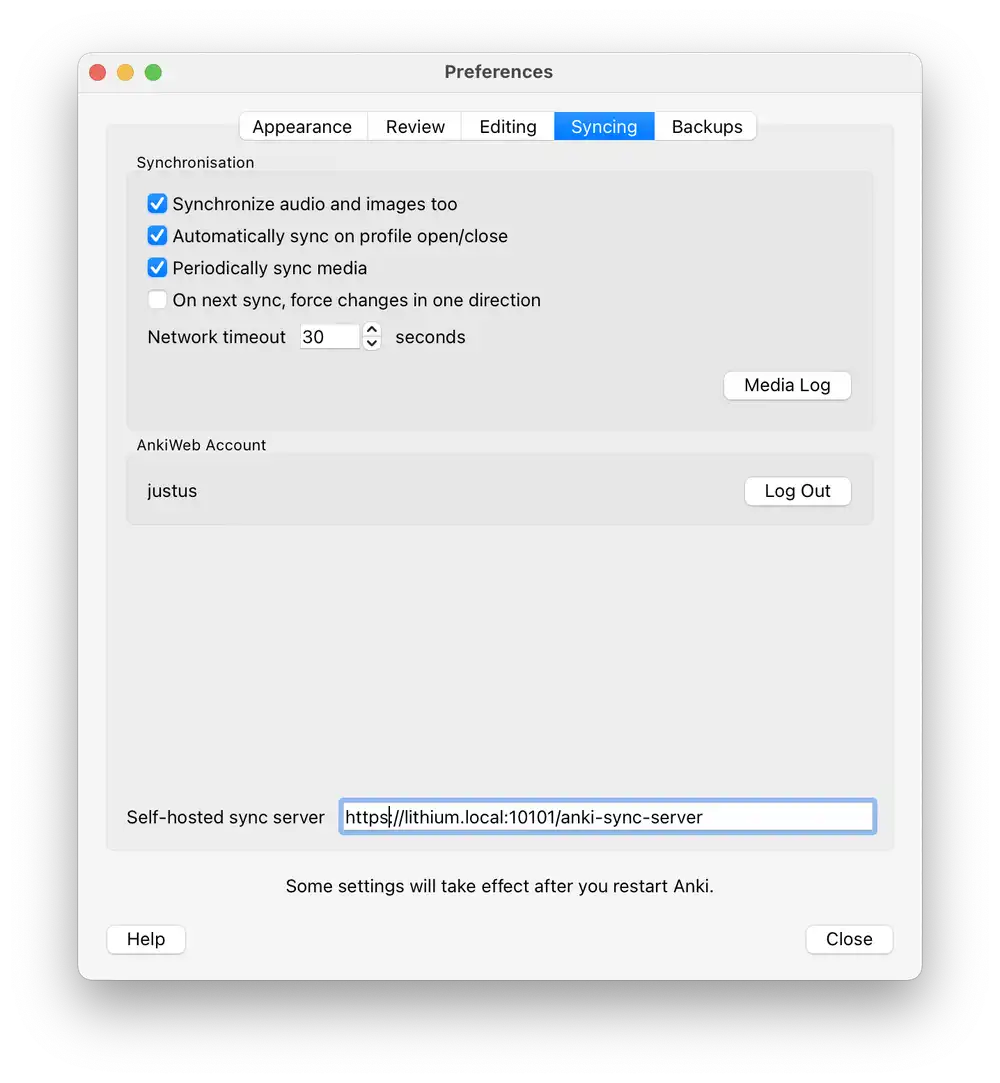
You can configure a custom sync server address in Anki Open in new tab (full image size 66 KiB)
On macOS, follow these steps to connect Anki to the Anki sync server:
- Open the Anki preferences by going to Anki > Preferences … or pressing
CMD + ,. - Open the Syncing tab and enter
http://localhost:18090. - Close the preferences.
- Press Sync in the top toolbar.
- Anki prompts you for username and password. Use the credentials that you have set in section 4., Create a user.
- Anki now syncs your data to your own Anki sync server.
Cross-compiling ARM assembly in a Nix flake
Here's how you can compile a small assembly targeting ARM assembly on a
x86_64 Linux machine (running Debian 12 with Nix in this case). This is the
assembly listing:
  .global main
  .type main, %function
main:
  mov w0, #123
  ret
Store the assembly listing in a file called src/main.s.
The program return 123 as a status code, and you can check whether the program
ran correctly later by checking echo $? in bash or similar. You can run the
program using qemu-aarch64 (not qemu-system-aarch64) to emulate an ARM CPU
and corresponding Linux user land. This removes the need of having to spin up a
virtual machine. It's handy when reverse engineering binaries on an x86_64
host.
To compile and run the preceding ARM assembly listing, you can
use Nix flake. Nix flake provides better
support for different targets and you can improve reproducibility between
builds. This is possible because nix flake fixes all dependencies in a
flake.lock file.
You may also want to use flake-utils
for an easier time specifying the flake file. The following shows the
flake.nix file listing:
{
  description = "Arm64 (aarch64) cross-compile demo";

  inputs.flake-utils.url = "github:numtide/flake-utils";

  outputs = { self, nixpkgs, flake-utils }:
    flake-utils.lib.eachDefaultSystem (system:
      let
        pkgs = import nixpkgs {
          inherit system;
          crossSystem = {
            config = "aarch64-unknown-linux-gnu";
          };
        };
      in
      {
        packages = rec {
          cross-arm-64-asm = pkgs.callPackage
            ({ stdenv, gcc }:
              stdenv.mkDerivation {
                name = "cross-arm-64-asm";
                nativeBuildInputs = [
                  gcc
                ];
                phases = [ "buildPhase" "installPhase" ];
                buildPhase = ''
                  $CC -march=armv8-a ${./src/main.s} -o main
                '';
                installPhase = ''
                  mkdir -p $out/bin
                  cp main $out/bin
                '';

              }
            )
            { };
          default = cross-arm-64-asm;
        };
      }
    );
}
Build the file by running nix build -L .#. On my system I got the following
output:
warning: Git tree '/home/justusperlwitz/projects/nix-tricks' is dirty
warning: Ignoring setting 'auto-allocate-uids' because experimental feature 'auto-allocate-uids' is not enabled
warning: Ignoring setting 'impure-env' because experimental feature 'configurable-impure-env' is not enabled
cross-arm> Running phase: buildPhase
cross-arm> Running phase: installPhase
Nix places the output in a symlinked folder called result:
# tree result
result
└── bin
    └── main

2 directories, 1 file
This is the signature of the resulting result/bin/main file:
# file result/bin/main
result/bin/main: ELF 64-bit LSB executable, ARM aarch64, version 1 (SYSV), dynamically linked, interpreter /nix/store/j8h1n0kgl15gpk270i7mr441yamnzvdg-glibc-aarch64-unknown-linux-gnu-2.38-27/lib/ld-linux-aarch64.so.1, for GNU/Linux 3.10.0, not stripped
If you have QEMU on your system, you can then run it like so:
$qemu-aarch64 ./result/bin/main
$echo $?
# Outputs `123`